· 04/16/2026 ·
Intel® Transparent Supply Chain (TSC)
The Intel® Transparent Supply Chain (TSC) comprises policies and procedures that OEMs/ODMs implement while manufacturing their products. The OEMs use the information collected to ensure transparency in their manufacturing process. IT departments use the information produced by the TSC to validate their platforms.
Transparent Supply Chain Overview
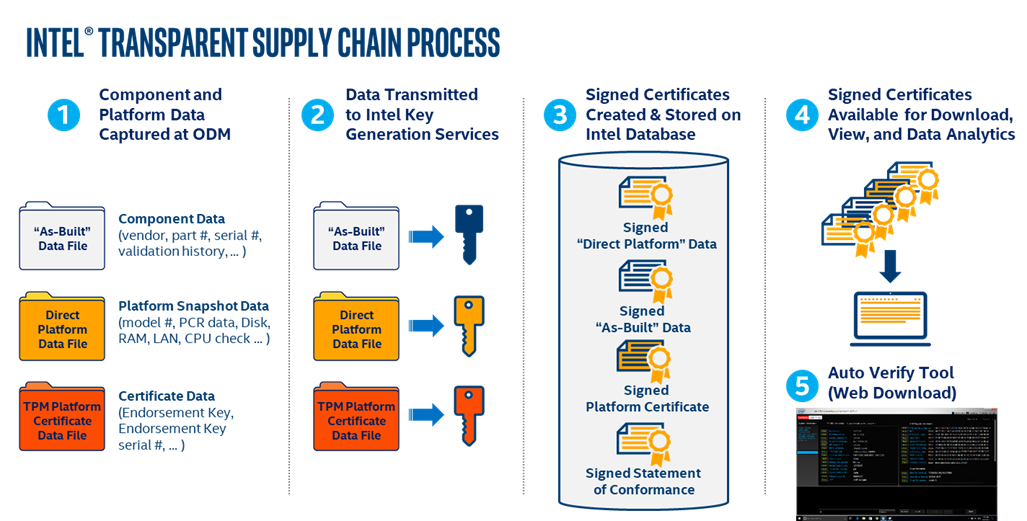
The Intel® Transparent Supply Chain (TSC) is composed of five separate processes:
- Platform component data is collected in real-time at the ODM Factory during manufacturing process using TSC Manufacturing Tools.
- Platform component data collected at the ODM is securely transmitted to Intel.
- Once Intel receives the platform component data collected during the manufacturing process, the data is signed by Intel at Intel’s High-Security signing facility using Intel’s Signing Certificate Authority.
- The signed data files are then uploaded to the TSC database for storage and retrieval by the TSC web portal.
- The TSC web portal enables the user to download the Local TSC Verify Tool and the signed platform data files.
Intel® Transparent Supply Chain Web Portal
The Intel® TSC Web Portal provides access to the Intel TSC data files for Intel TSC-enabled systems. The Intel TSC Web Portal enables admin users to manage Admin API keys and users. The Web Portal also contains documentation and download links for The Intel TSC Local Verify Tool. The user also has the option to remove their account and personal information from the web portal in compliance with GDPR.
The TSC Local Verify Tool can be downloaded from the TSC Web Portal Downloads once access has been granted.
The TSC Web Portal is located on the Intel® TSC domain URL: https://portal.tsc.trustauthority.intel.com/
TSC Local Verify Tool Overview
The TSC Local Verify Tool is a standalone application that runs under the Windows operating system. The tool performs the following functions:
- Scanning the system component information.
- Reading the Direct Platform Data file
- Validation of the Platform Certificate issued to the platform.
- Validation of the Direct Platform Data file generated at the factory during manufacturing.
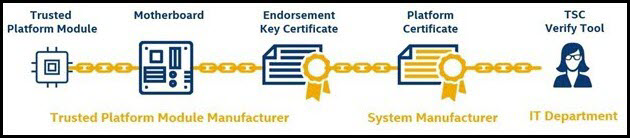
X.509 Platform Certificates
Every platform has a unique X.509 Platform Certificate signed by the Intel Signing Authority. This unique Platform Certificate is cryptographically bound to the system through the TPM module installed during manufacturing.

Platform Certificates Validation
- Verifies that the platform TPM module matches the signed platform certificates.
- Platform Attestation is confirmed by comparing the TPM module's Endorsement Key Serial Number against the System Serial Number and Motherboard Serial numbers.
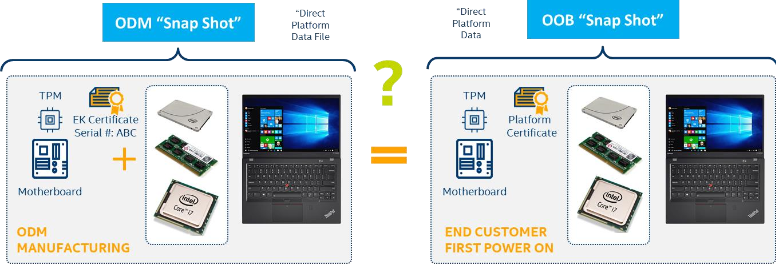
Direct Platform Components Validation
The direct platform components validation compares the snapshot of the platform component data taken during manufacturing at the ODM's factory with the snapshot taken at the first boot. It answers the question: "Is the platform that arrived at the customer the same as the one that shipped from the ODM's factory?" Any changes in the Direct Platform Data from the ODM to the Customer are flagged.
TSC Local Verify Tool Download and Installation
TSC Local Verify Tool Download
The Intel® Transparent Supply Chain Portal Download Center will allow the user to download the TSC Verify Tool. On the left-hand navigation section select Download center. The Download Center page contains the Verify Tools for Windows and Linux, and the Remote Verify Tool for Platform Lifecycle Assurance.
Log in to the Intel TSC web portal.
Select the Download Center Tab
Download the TSC local verify tool zip file.

Create the following directory:
`C:\Users\User\Documents\TSCVERIFY
Move the TSC local verify tool zip file to the directory.
Extract the contents of the TSC local verify zip file into the TSCVERIFY directory.
The TSC local verify tool zip contains the following files:
TSCVerifyTool.exeDirectPlatformData.iniXSD Folder
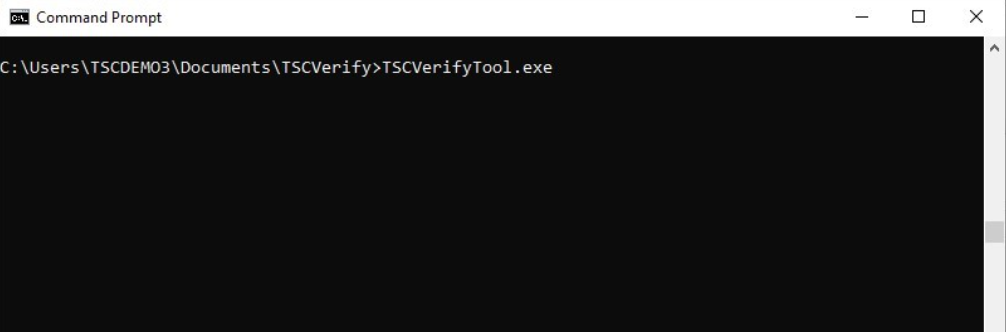
Open a command prompt.
Navigate to the folder in which the
TSCVerifyTool.exewas extracted.Run the following command to execute the TSC local verify tool.
C:\Users\User\TSCVERIFY\TSCVerifyTool.exe
TSC Local Verify Tool System Requirements
The Windows version of the TSC Local Verify Tool is compatible with Windows 10, Windows 11, WinPE, and Windows Server 2016/2020. The tool is provided as a signed executable file named TSCVerifyTool.exe.
TSC Local Verify Tool Commands
The TSC Local Verify Tool is a command-line executable that runs in Windows Command Prompt.
The TSC Local Verify Tool has the following commands:
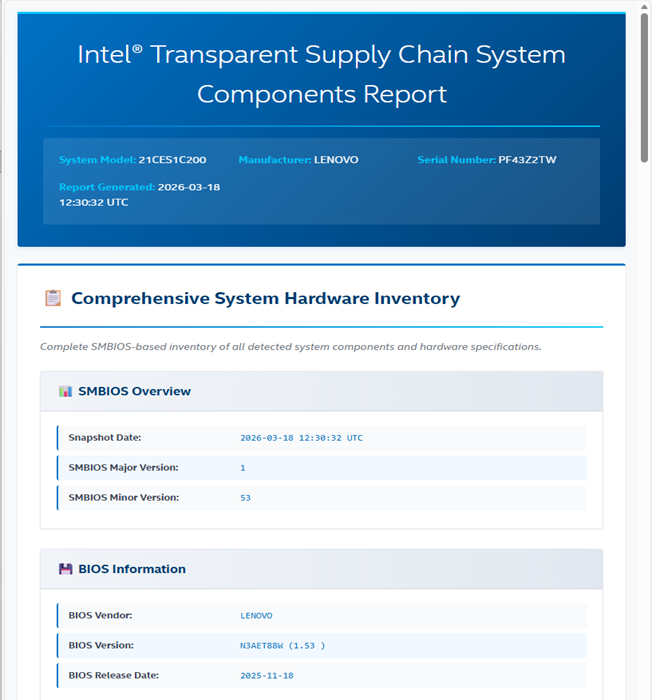
SCANSYSTEM - This command scans the platform to read the current platform values and outputs the platform component values to the console. There are no input or output files associated with the SCANSYSTEM command. The output will be directed to the console output. If the –html flag is included the output will also be written to an html file.
READFILE - This command will read in the Direct Platform Data file specified by the –in file option and output the values out to the console output. The TSC Issuing CA file is specified by the –ca file option.
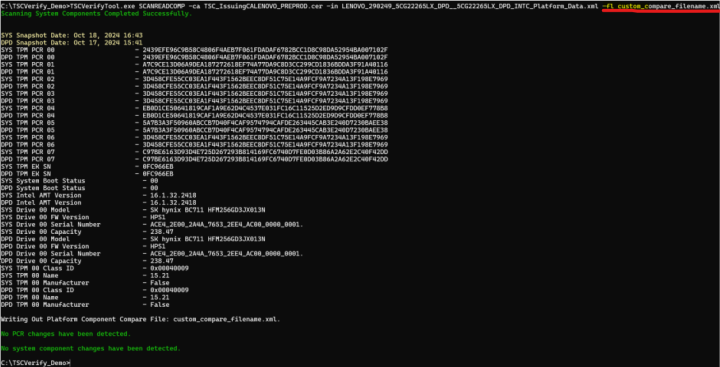
SCANREADCOMP - This command scans the platform to read its current values. It then reads the Direct Platform Data file specified by the –in option and compares the values. The comparison results are output to the console. If the –fl flag is included the comparison results will be written to the file specified (output file). If the –html flag is included the comparison results will be written to an html file. The TSC Issuing CA file is specified by the –ca file option.
PFORMCRTCOMP - This command compares the contents of the signed platform attribute certificate file specified by the –in option to the current information from the system. It detects changes in elements like the EK Serial Number from the Trusted Platform Module and the Platform Serial Number in the system. It also compares the platform configuration from the file against the current components of the system. The results of the comparison are sent to the console. If the –fl flag is included the comparison results will be written to the file specified (output file). The command indicates whether changes were detected at the system or component level as yellow warning messages. The TSC Issuing CA file is specified by the –ca file option.
If the result of the comparison is successful, then a success message is displayed saying PFORMCRTCOMP PASS.
If the result of the comparison is not successful, then it displays PFORMCRTCOMP FAIL. It also shows the differences line by line in red.
CASIGVERIFY - This command verifies the signature of the TSC Issuing CA file. Optionally, it also verifies the signature of a signed platform attribute certificate or Direct Platform Data File using the public key of the TSC Issuing CA certificate.
The TSC Issuing CA file is specified by the –ca option. The signed platform attribute certificate or signed Direct Platform Data File is specified by the –in option. The CASIGVERIFY command will only verify one file at a time.
The following is the Command Line Syntax of commands and options:
Commands
| Commands | Command Line Options | Description |
|---|---|---|
| SCANSYSTEM | -html, /html | Flag to turn on html output. |
| READFILE | -in, /in -ca, /ca |
Flag to specify the direct platform data input file. Flag to specify the CA certificate file. |
| SCANREADCOMP | -in, /in -ca, /ca -ini, /ini -html, /html -fl, /fl |
Flag to specify the direct platform data input file. Flag to specify the CA certificate file. Flag to specify direct platform data.ini file Flag to turn on html output. Flag to specify comparison results output file. |
| PFORMCRTCOMP | -in, /in -ca, /ca -html, /html -fl, /fl |
Flag to specify the platform certificate data input file. Flag to specify the CA certificate file. Flag to turn on html output. Flag to specify comparison results output file. |
| CASIGVERIFY | -ca, /ca | Flag allows user to load CA cert. |
Miscellaneous Options
The flags listed below can be used with any of the commands listed in the above tables.
Command Options
| Options | Description |
|---|---|
| -vl,/vl | Flag to turn on verbose |
| -notpm,/notpm | Flag to allow user to collect DPD on non-TPM system or board. |
| -nohdd,/nohdd | Flag to allow user to skip the hard drive in generating DPD file. |
| -noamt,/noamt | Flag to skip the Intel® AMT Version Verification. |
| -ecc,/ecc | Flag to specify to retrieve the EK TPM certificate using ECC algorithm. |
| -server,/server | Flag to support server features: BMC, FRU, SDR & etc. |
| -dsg,/dsg | Flag to support DSG server configurations. |
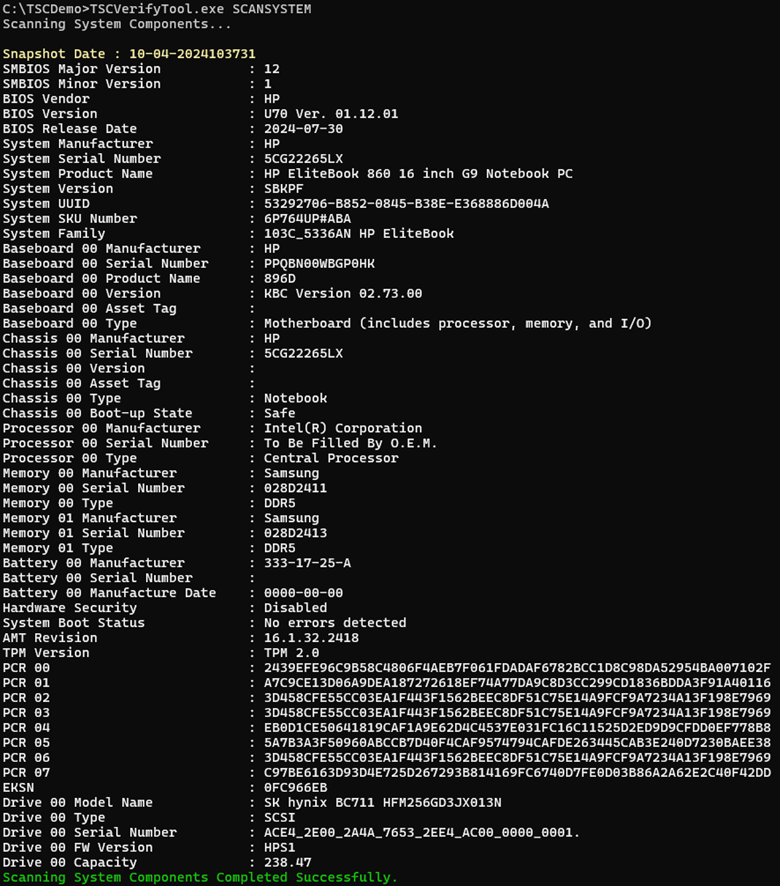
Scan System Command SCANSYSTEM
This command scans the platform to read the current platform values and sends the platform component values to the console. The SCANSYSTEM command does not involve an input or output file; all output is directed to the console.
The SCANSYSTEMcommand performs the following operations:
- Read the System BIOS DMI Tables for BIOS, System, Motherboard, Chassis, Processor, Memory, Security/AMT, Power Supplies, Batteries, Camera, USB, Fingerprint Reader, Bluetooth, Keyboard, Touchpad and TrackPoint.
- Reads the Trusted Platform Module PCR registers, the public endorsement key, and the endorsement key serial number.
- Reads the drive information (note: removable drives are not scanned).
Read File Command READFILE
This ccommand will read in the Direct Platform Data file specified by the file selected –in –ca file option.
The TSC Issuing CA file is specified by the –ca file option
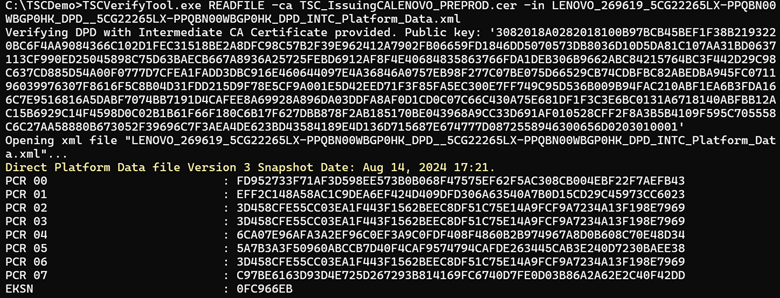
The DPD file is a signed XML file. Once the DPD file has been read, the XML signature of the XML file is verified against the TSC_Issuing CA. If the DPD file XML signature does not match, the following error message is displayed:
Direct Platform Data file: DPD_Filename.xml - XML file signature does not match.
Scan System Read File Compare SCANREADCOMP
This command scans the platform components and reads in the Direct Platform Data file specified by the file selected –in -fl option is used, the Platform Component Change data file is generated with the provided filename; otherwise, a default filename is used. This data file contains a consolidated summary of the results for the compare command.
After the compare operation has been completed the two success messages are displayed. The first one indicates tha the PCR information matched against the system. The second message indicates that all the components information matched against the systems.
If the results of the compare operation do not match, the following message is displayed:
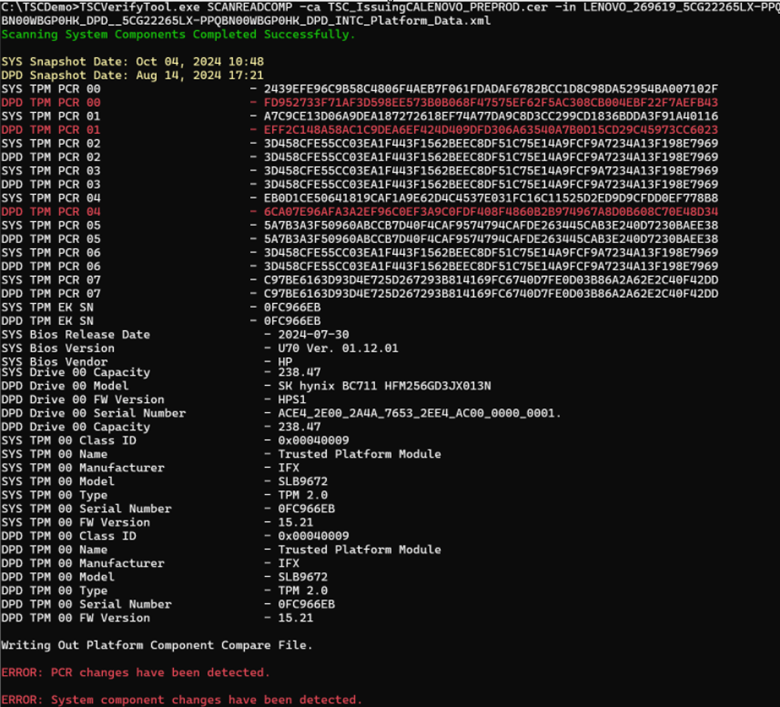
The changes between the System Snapshot data and the DPD are displayed line by line. Any Component Data changes are displayed in red.
It will display an error message if the changes were detected either on the TPM PCRs or at the system component level.
Platform Component Compare Data File
After the comparison is performed, a Platform Component Compare data xml file is written. When the –fl option is used, it allows customization of the file name. If the –fl option is not used, the tool creates the file using a default filename.
When the compare operation has been completed, the Platform Component Compare data file is created. If the results of the compare operation match, then the data file compare results will be true.
<?xml version="1.0" encoding="utf-8"?>

<PlatformComponentCompare ver="1">

    <Header>
        <SystemSN>PF0ZAQSW</SystemSN>
        <Manufacturer>OEM_NAME</Manufacturer>
        <Model>20L7002BUS</Model>
        <DateTime>2020-08-13T11:21:38</DateTime>
        <OEM>OEM_NAME</OEM>
        <ODM>OEM_NAME</ODM>
    </Header>

    <CompareResults>
        <CompareResult>true</CompareResult>
        <ComponentScanCount>10</ComponentScanCount>
        <ComponentChangeCount>0</ComponentChangeCount>
    </CompareResults>

</PlatformComponentCompare>
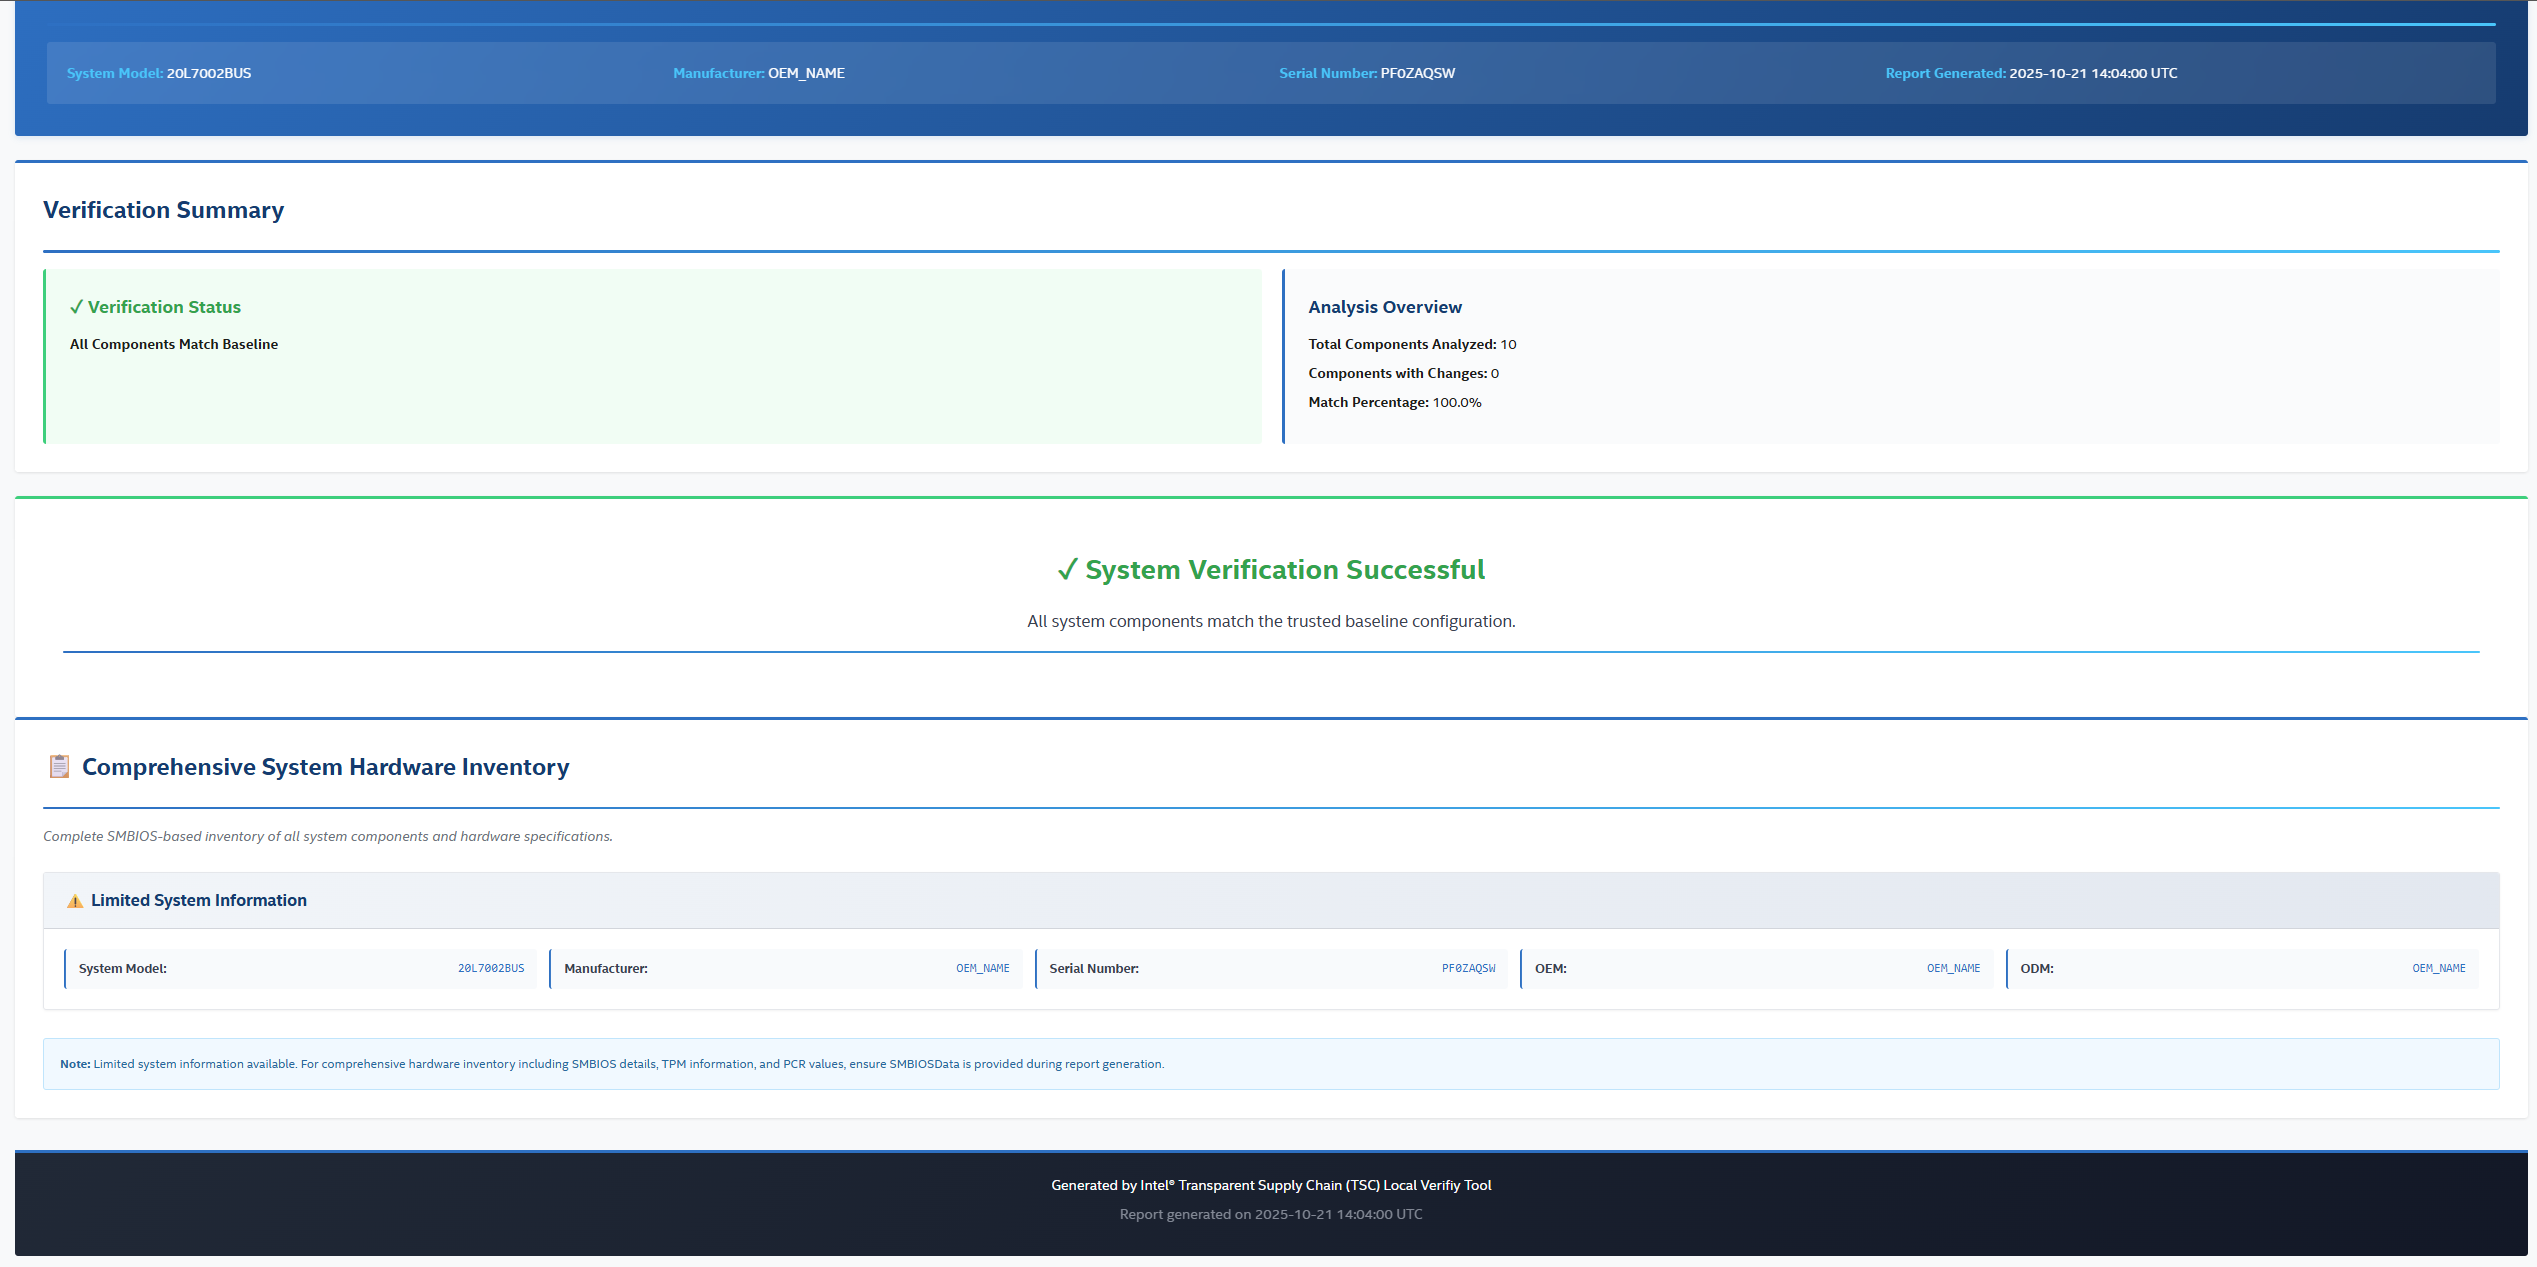
HTML output file
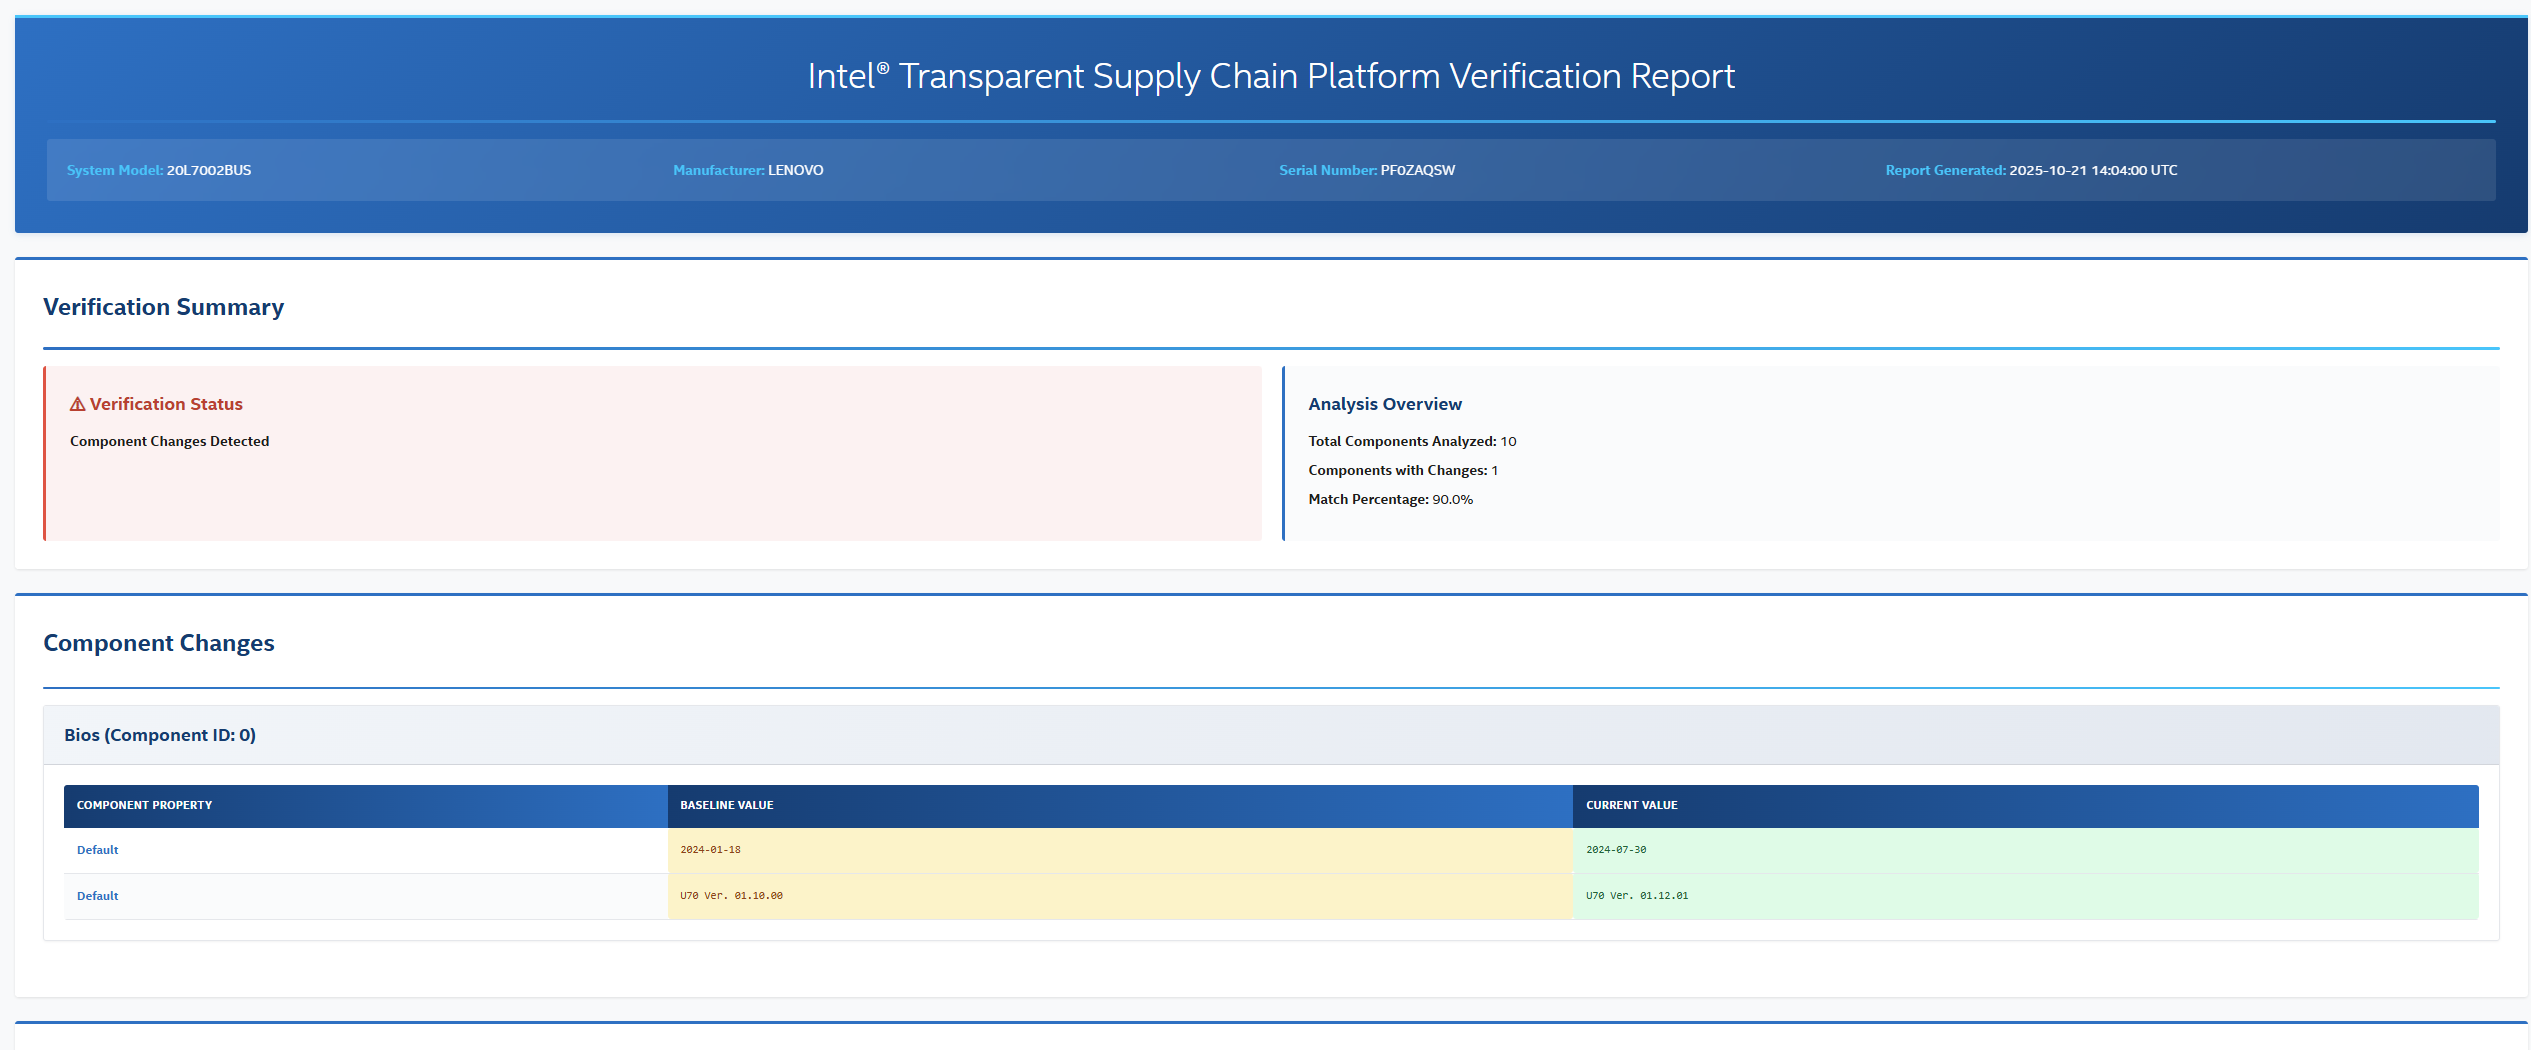
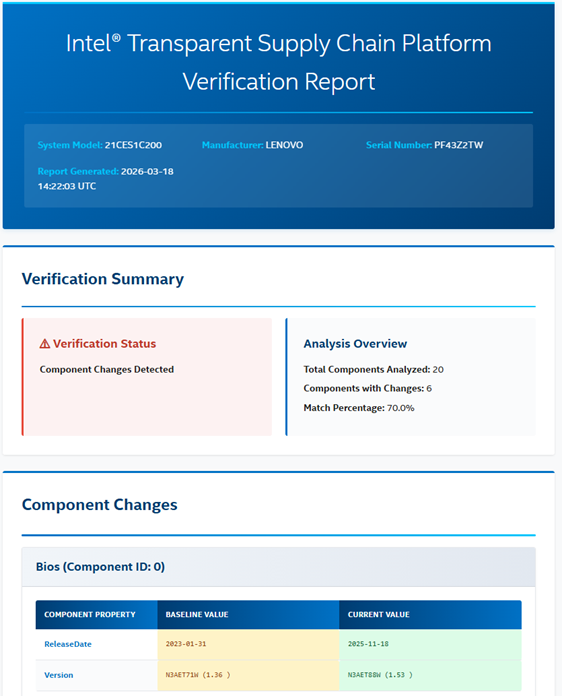
Component Changes

If the results of the Compare operation return changes, then the data file compare results are false along with the components that have changed.
Platform Component Compare Data File
When the compare operation has been completed then the Platform Component Compare data file will be written out. If the results of the Compare operation match, then the Compare Results will be true.
<?xml version="1.0" encoding="utf-8"?>

<PlatformComponentCompare ver="1">

    <Header>
        <SystemSN>PF0ZAQSW</SystemSN>
        <Manufacturer>LENOVO</Manufacturer>
        <Model>20L7002BUS</Model>
        <DateTime>2020-08-13T10:23:18</DateTime>
        <OEM>LENOVO</OEM>
        <ODM>LENOVO</ODM>
    </Header>

    <CompareResults>
        <CompareResult>false</CompareResult>
        <ComponentScanCount>10</ComponentScanCount>
        <ComponentChangeCount>1</ComponentChangeCount>
    </CompareResults>

    <ComponentChanges>
        <ComponentChange id="0">
            <ComponentType>Bios</ComponentType>
            <ComponentName>Default</ComponentName>
            <SystemValue>2024-07-30</SystemValue>
            <SnapshotValue>2024-01-18</SnapshotValue>
            <ComponentName>Default</ComponentName>
            <SystemValue>U70 Ver. 01.12.01</SystemValue>
            <SnapshotValue>U70 Ver. 01.10.00</SnapshotValue>
        </ComponentChange>
    </ComponentChanges>

</PlatformComponentCompare>
Platform Component Compare Data File XML Schema
The Platform Component Compare data file XML schema is as follows:
<xs:schema attributeFormDefault="unqualified" elementFormDefault="qualified" xmlns:xs="http://www.w3.org/2001/XMLSchema">
    <xs:element name="PlatformComponentCompare">
        <xs:complexType>
            <xs:sequence>
                <xs:element name="Header" maxOccurs="1" minOccurs="0">
                    <xs:complexType>
                        <xs:sequence>
                            <xs:element type="xs:string" name="SystemSN"/>
                            <xs:element type="xs:string" name="GUID" maxOccurs="1" minOccurs="0"/>
                            <xs:element type="xs:string" name="Manufacturer"/>
                            <xs:element type="xs:string" name="Model"/>
                            <xs:element type="xs:dateTime" name="DateTime"/>
                            <xs:element type="xs:string" name="OEM"/>
                            <xs:element type="xs:string" name="ODM" maxOccurs="1" minOccurs="0"/>
                            <xs:element type="xs:string" name="MfgPubKeyHash" maxOccurs="1" minOccurs="0"/>
                        </xs:sequence>
                    </xs:complexType>
                </xs:element>
                <xs:element name="CompareResults" maxOccurs="1" minOccurs="0">
                    <xs:complexType>
                        <xs:sequence>
                            <xs:element type="xs:boolean" name="CompareResult"/>
                            <xs:element type="xs:int" name="ComponentScanCount"/>
                            <xs:element type="xs:int" name="ComponentChangeCount"/>
                        </xs:sequence>
                    </xs:complexType>
                </xs:element>
                <xs:element name="ComponentChanges" minOccurs="0">
                    <xs:complexType>
                        <xs:sequence>
                            <xs:element name="ComponentChange" maxOccurs="unbounded" minOccurs="0">
                                <xs:complexType>
                                    <xs:sequence>
                                        <xs:element type="xs:string" name="ComponentType" maxOccurs="1" minOccurs="0"/>
                                        <xs:element type="xs:string" name="ComponentName" maxOccurs="unbounded" minOccurs="0"/>
                                        <xs:element type="xs:string" name="SystemValue" maxOccurs="unbounded" minOccurs="0"/>
                                        <xs:element type="xs:string" name="SnapshotValue" maxOccurs="unbounded" minOccurs="0"/>
                                    </xs:sequence>
                                    <xs:attribute type="xs:short" name="id"/>
                                </xs:complexType>
                            </xs:element>
                        </xs:sequence>
                    </xs:complexType>
                </xs:element>
            </xs:sequence>
            <xs:attribute type="xs:string" name="ver"/>
        </xs:complexType>
    </xs:element>
</xs:schema>
HTML output file
Platform Component Compare Behavior
The Component Compare command scans the platform and generates a list of the detected components. The Command then reads the Direct Platform data file and generates the list of components from the file.
During the comparison operation the comparison algorithm will then compare the 2 list of components. The Compare Command will then begin the component comparison logic to compare the individual components from each list.
The Comparison Results have 4 different outcomes: Components Match, Component Changed, Component Removed and Component Added.
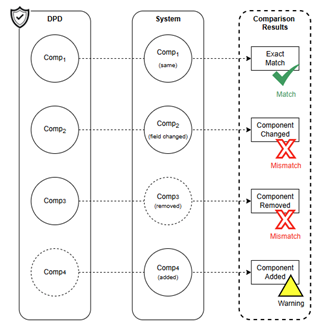
Components Match - If the platform component information matches the Direct Platform Data file component information, then the comparison logic will return an exact component match and will assign a pass to that component.
Component Changed - If there is a change to platform component information compared to the Direct Platform Data file component information, then the comparison logic will return a component mismatch and flag a fail to that component.
Component Removed - If there is a component not detected in the platform component list that was in the Direct Platform Data file component list, then the comparison logic will return a component mismatch and flag a fail to that component.
Component Added - If there is a component detected in the platform component list that is not in the Direct Platform Data file component list, then the comparison logic will return a warning that one or more components have been added to the system. It will not flag the component as a mismatch.
Direct Platform Data ini File
The DirectPlatformData.ini file is used to enable or disable the collection and checking of component data and the individual TPM PCR registers. If the component is enabled then the comparison logic will check the platform component information and compare the Direct Platform Data file component information.
The following additional (Extended) components have been added to the platform component list; Integrated Camera, USB, Integrated Fingerprint Reader, Bluetooth, Keyboard, Touchpad and TrackPoint.
The following Table contains the DirectPlatformData.ini file definitions:
DirectPlatformData.ini
| Direct Data Component | Default Setting | Definition |
|---|---|---|
| PCRMask= | 101100101110111111111111 PCR registers 1, 4, 5, 7 & 11 comparison checks are disabled | PCR Mask will enable/disable the individual TPM Registers 0-23. Each digit represents 1 PCR register with PCR Register 0 being the leftmost digit and PCR 23 being the rightmost digit. |
| BiosEnabled= | 1 (Enabled) | BIOS version (SMBIOS Table 0) check |
| BaseboardEnabled= | 1 (Enabled) | Motherboard version (SMBIOS Table 2) check |
| AMTEnabled= | 1 (Enabled) | vPro AMT version (SMBIOS Table 131) check |
| CpuEnabled= | 1 (Enabled) | Processors’ information (SMBIOS Table 4) check |
| MemoryEnabled= | 1 (Enabled) | DIMM modules’ information (SMBIOS Table 17) check |
| HddEnabled= | 1 (Enabled) | HDD/SATA Internal Drive information check |
| TpmEnabled= | 1 (Enabled) | TPM module information (separate from PCR registers) check |
| NICEnabled= | 0 (Disabled) | Network Card / Network Adaptors’ information check |
| WiFiEnabled=/td> | 0 (Disabled) | WiFi Card / WiFi Adapter information check |
| BatteryEnabled= | 1 (Enabled) | Integrated Batter information check |
| Extended Components | Default Setting | Definition |
| CameraEnabled= | 1 (Enabled) | Integrated Camera information check |
| USBEnabled= | 1 (Enabled) | USB Devices information check |
| FingerPrintReaderEnabled= | 1 (Enabled) | Integrated Fingerprint Read information check |
| BlueToothEnabled= | 1 (Enabled) | Bluetooth Card/ Bluetooth Adapter information check |
| KeyboardEnabled= | 1 (Enabled) | Integrated Keyboard information check |
| TouchPadEnabled= | 1 (Enabled) | Integrated Touch Pad information check |
| TrackPointEnabled= | 1 (Enabled) | Integrated Track Point information check |
| VideoEnabled= | 0 (Disabled) | Integrated Video Controller information check |
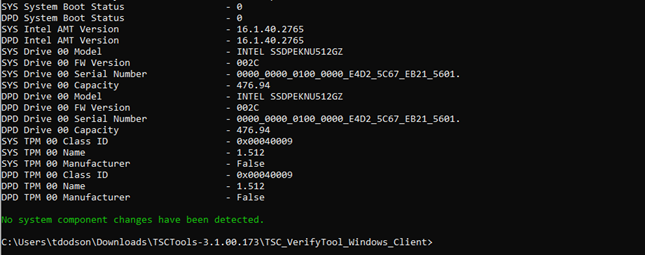
Scan Read Compare (Match) Console Output
After the compare operation has been completed two success messages will be displayed. The first one indicates that PCR information did match against the system and the second one indicates that all the components information did match against the system.
Scan Read Compare (Changes) Console Output
If there are component changes between the System Snapshot data and the Direct Platform Data the changes will be displayed line by line along with an error message will be displayed.
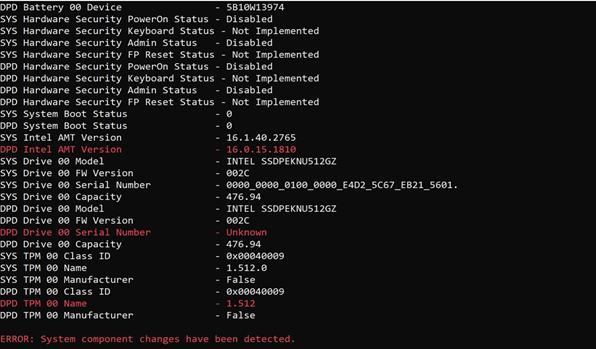
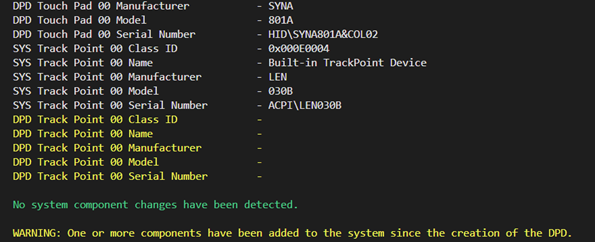
Scan Read Compare (Added) Console Output
If there is a component detected in the platform component list that is not in the Direct Platform Data file component list, then the comparison logic will return a component added and assign a warning that one or more components have been added to the system.
Scan Read Compare (Changes) HTML Output
If there are component changes the changes between the System Snapshot data and the Direct Platform Data the changes with an error message will be written to an HTML file.
Platform Certificate Compare Command PFORMCRTCOMP
This command compares the contents of the signed platform attribute certificate file specified by the –in option to the current system information. It detects changes in elements such as the EK Serial Number in the Trusted Platform Module and the Platform Serial Number in the system. It also compares the platform configuration from the file against the current components from the system. The results of the comparison are output to the console. The command indicates whether changes were detected at the system or component level as yellow warning messages. If the result of the comparison is successful, a success message is displayed in yellow: PFORMCRTCOMP PASS. If the result of the comparison is successful, then it displays a failure message in red: PFORMCRTCOMP FAIL.
The differences are shown line by line in red.
The Platform Certificate Verify function checks the Platform Certificate file issued for the platform against the platform itself, using the TPM as the hardware root of trust. It verifies that the system manufacturer, version, serial number, and motherboard serial number match the values in the signed platform certificate.
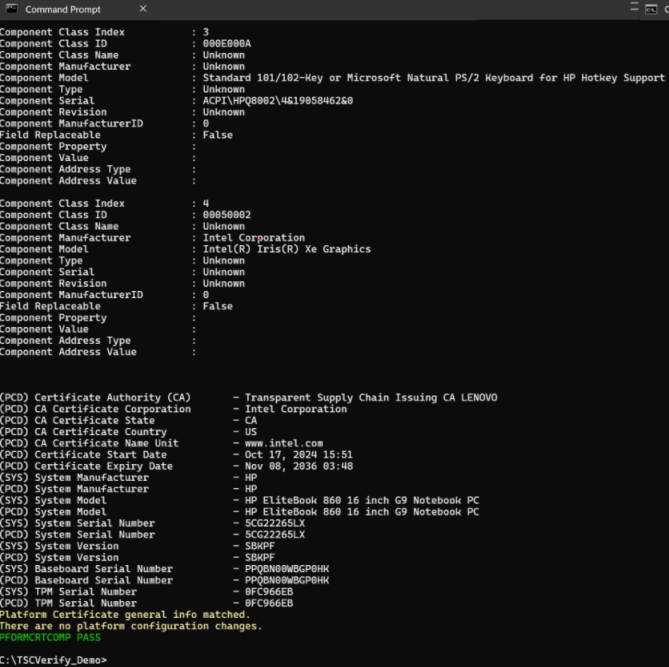
Platform Cert Compare (Match) Console Output
If the Platform Certificate matches the System values then the Platform Certificate general info matched and There are no platform configuration changes messages will be displayed along with the Certificate Values. In addition, the command will output a success message indicating that the command was successful (i.e. PFORMCRTCOMP PASS).
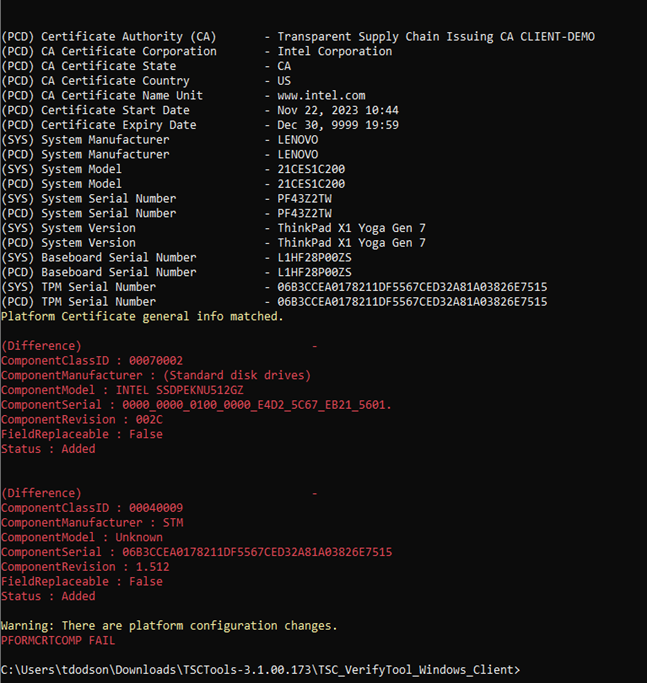
Platform Cert Compare (Changes) Console Output
If the Platform Certificate does not match the System values, then two possible messages will be displayed: If the information that did not match is related to values like Serial Number, Model, Manufacturer, EK TPM Serial Number and others then the Platform Certificate general info did not match message is displayed. If the differences found are related to platform components configuration, then there are platform configuration changes messages will be displayed. All the differences that are found are going to be highlighted in red. Finally, the command will output an error message indicating that the command was not successful (i.e. PFORMCRTCOMP FAIL)
PFORMCRTCOMP FAIL
CA signature verify command CASIGVERIFY
This command verifies the signature of the TSC Issuing CA file. Optionally, it also enables verification of the signature of either a signed platform attribute certificate or a signed Direct Platform Data File using the public key of the TSC Issuing CA certificate. The TSC Issuing CA file is specified by the –ca file option –in –in
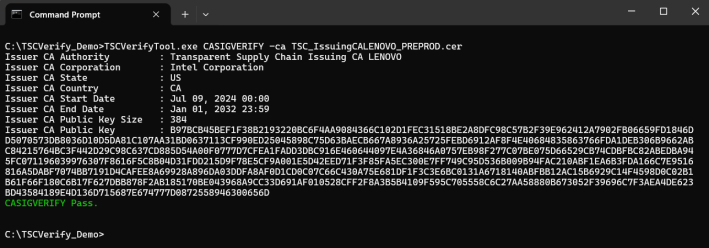
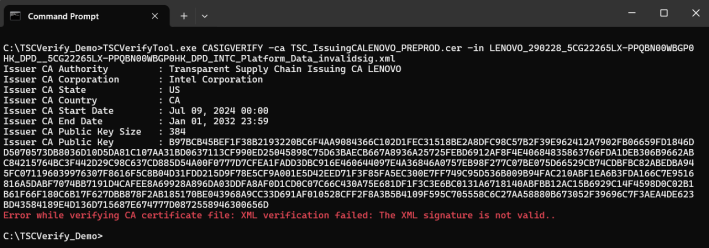
Passing Signed Direct Platform Data File
When no valid signed Direct Platform Data file is being passed, the command displays an error message.
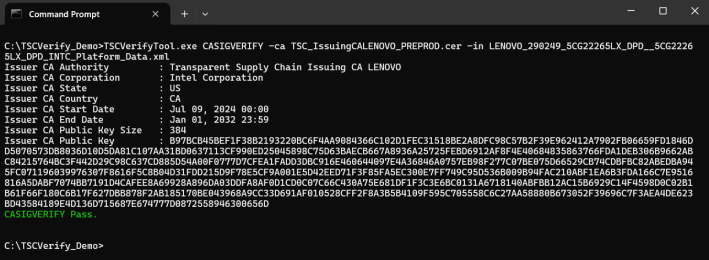
Passing Signed Platform Attribute Certificate
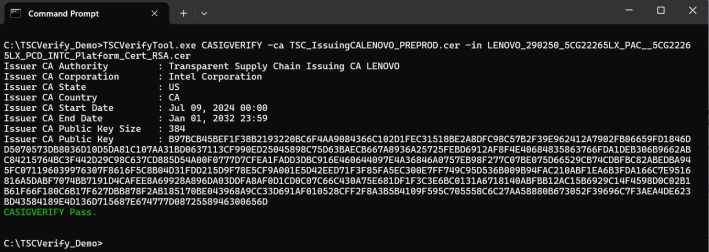
The Platform Attribute Certificate and the Direct Platform Data files are downloaded from the TSC Web Portal are signed using a PKI signing process. To validate the signature of these files, an Intermediate Certificate Authority file is used.
This Intermediate Certificate Authority file contains a public key that is used to verify the signature of the Platform Attribute Certificate file and the Direct Platform Data files.
Download the Intermediate Certificate Authority file and save it on the system. If you don’t know where to download your Issuing CA, please contact the TSC web portal team, and they will help you to retrieve your Issuing CA.cer file.
Open-Source acknowledgments
This product includes software developed by the open-source community.
Bouncy Castle (Version 1.9) Bouncy Castle is a collection of APIs used in cryptography. It is licensed under the MIT License. Copyright (c) 2021 The Legion of the Bouncy Castle Inc. (https://www.bouncycastle.org) For more details, see the Bouncy Castle License: https://www.bouncycastle.org/licence.html
Microsoft TSS (Version 2.1.1) Microsoft TSS is a library for TPM 2.0. It is licensed under the MIT License. Copyright (c) 2019 Microsoft Corporation For more details, see the Microsoft TSS License: https://github.com/Microsoft/TSS.MSR/blob/main/LICENSE