Important
Deprecation Notice
The Intel® Transparent Supply Chain Auto Verify Tool described in this document is being deprecated and will no longer be supported in future releases.
Intel recommends that you migrate to the TSC Local Verify Tool which provides enhanced functionality and improved performance. Specifically, please use the SCANSYSTEM and SCANREADCOMP command which offer the same verification capabilities as the Auto Verify Tool with additional features.
Important: The TSC Local Verify Tool Windows version provides the -html option with the SCANSYSTEM and SCANREADCOMP command, which generates HTML output reports that can effectively replace the graphical interface functionality of the Auto Verify Tool. This allows you to maintain visual reporting capabilities while benefiting from the improved command-line tool.
For detailed information about the TSC Local Verify Tool and the SCANSYSTEM and SCANREADCOMP command, please refer to our TSC Local Verify Tool documentation.
Intel® Transparent Supply Chain Auto Verify tool
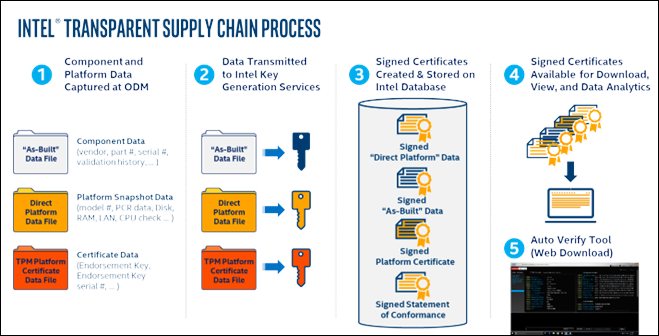
The Intel® Transparent Supply Chain is a set of policies and procedures that OEMs/ODMs utilize in the manufacturing of their products. This information is collected during manufacturing prior to shipping the platforms to the End Customer. The information produced by Intel Transparent Supply Chain tools is used by IT departments to validate that the platforms they receive from the OEM are the platforms that were manufactured at the OEM’s factory.
The Intel Transparent Supply Chain is composed of 5 separate components:
- Platform data at the OEM’s factory is collected in real time using Intel Transparent Supply Chain manufacturing tools.
- The Platform Data collected at the OEM’s factory is securely transmitted to Intel using a Secure File Transfer Protocol (SFTP).
- Once Intel receives the Platform Data from the OEM, it is signed at Intel’s High-Security signing facility using Intel’s Signing Certificate Authority.
- The Signed Platform Data files are then uploaded to the Intel TSC database for storage and retrieval by the Web Portal.
- The Intel TSC Web Portal allows the end user to download the signed Platform Data files and the Intel Transparent Supply Chain Auto Verify Tool.
Intel® Transparent Supply Chain Web Portal
The Intel Transparent Supply Chain Web Portal enables the user to request an account, enter the system serial numbers, and download the Platform Data. Once access has been granted, the AutoVerify Tool can be downloaded from the Web Portal.
The Transparent Supply Chain Web Portal is located on the Intel® Transparent Supply Chain domain URL: https://portal.trustauthority.intel.com/
Auto Verify Tool overview
The Intel® Transparent Supply Chain (Intel TSC) Auto Verify Tool is a standalone application that runs under Windows® 10 or later operating systems. It performs two essential functions: validating the platform certificate issued to the platform and validating the platform component data generated at the factory during manufacturing. The validation results are displayed graphically on the Auto Verify Tool GUI.
X.509 Platform Certificates
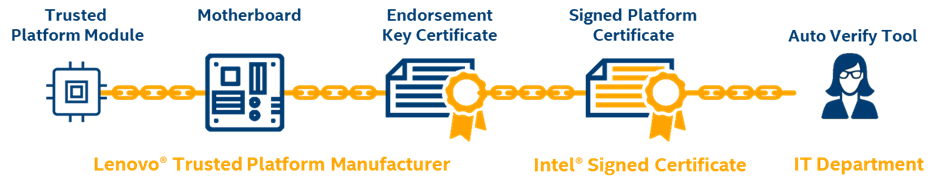
Every platform has a unique X.509 Platform Certificate signed by the Intel Signing Authority. This unique Platform Certificate is cryptographically bound to the System through the Trusted Platform Module (TPM) installed in the system at the time of manufacturing. For more information, see the Platform certificate file section of the Transparent Supply Chain data files article.
Platform certificate validation
Every platform has a unique X.509 platform certificate signed by the Intel signing authority. This unique platform certificate is cryptographically bound to the system through the TPM module installed during manufacturing. The Auto Verify Tool does the following:
- Verifies that the platform TPM module matches the signed platform certificates from the Customer Web Portal.
- Platform Attestation is confirmed by comparing the TPM module's Endorsement Key Serial Number against the System Serial Number and Motherboard Serial numbers.
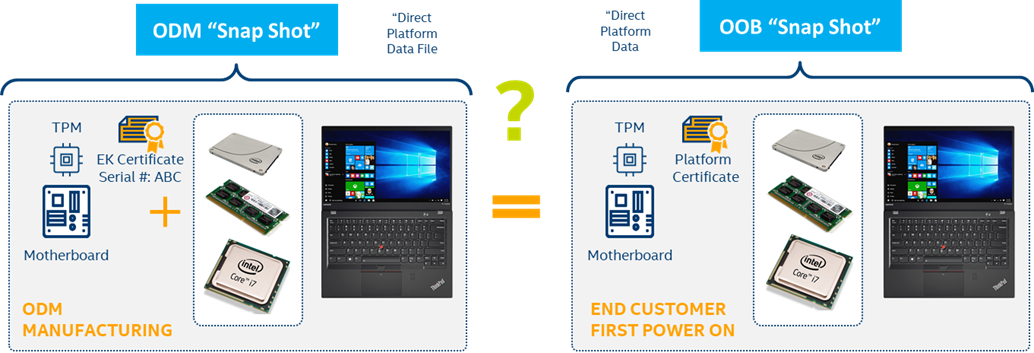
Direct platform data snapshots
The Intel TSC Auto Verify Tool generates direct platform data snapshots. These snapshots scan the platform and generate direct platform data. See the Direct platform data file section of the Transparent Supply Chain data files article for more information.
Direct platform components validation
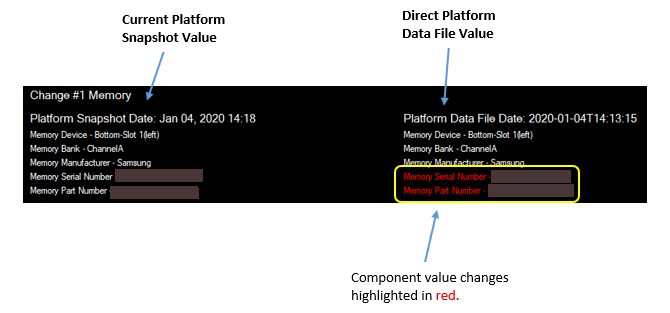
The direct platform components validation compares the snapshot of the platform component data taken during manufacturing with a snapshot of the platform components taken at the first boot. It answers the question, "Is the platform that arrived at the customer the same platform that shipped out of the ODM's factory?"
The Auto Verify tool plays a crucial role in ensuring the integrity of the platform components. It uses snapshots to compare the contents of the direct platform data, flagging any changes from the ODM to the customer.
Auto Verify Tool download and installation
The Auto Verify Tool zip file is downloaded from the Intel® Transparent Supply Chain Web Portal.
Auto Verify Tool download
Log in to the Intel TSC Web Portal.
Select the Transparent Supply Chain MANAGE SERVICES button.
Select Download center.
Select Download.
Navigate to the folder where the
TSC_AutoVerifyTool_Windows_Client.zipwas downloaded and extract the zip file. TheAutoVerifyTool.exe.To execute the Auto Verify Tool, select the
AutoVerifyTool.exefile.The Auto Verify Tool application is executed, and the AutoVerifyTool graphical user interface is displayed.
Auto Verify Tool user interface
User interface
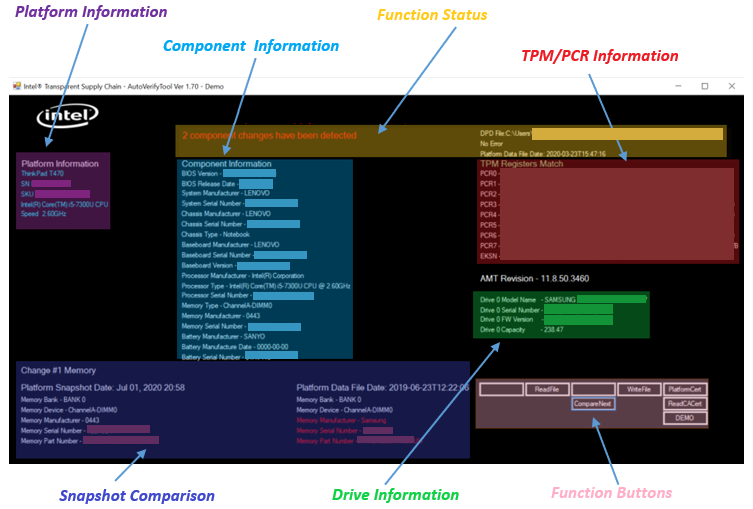
The Intel TSC Auto Verify Tool user interface is divided into the following sections:
- Platform Information on the left-hand section
- Component Information in the middle section
- Function Status located on top middle section on the upper right -hand section
- File Info and Status Section
- File Info and Status Section
- TPM/PCR Information on the right-hand section
- Snap Shot Comparison located at the bottom center
- Direct Platform Data located at the bottom center
- Drive Information located on the middle right-hand side
- Function Buttons located along the bottom right-hand of the UI
Function status information
Function status information provides operational information from the Auto Verify Tool. It displays the state of the scan when one of the Function buttons is selected. The status also displays the function's status result. Function status information provides operational information from the Auto Verify Tool. It displays the state of the scan when one of the Function buttons is selected. The status also displays the function's status result.
Snapshot Date displays the date and time of the current scan when the Scan System button is selected or the date and time of the snapshot file read by the Read File function.
File Information/Status
This section displays the status of the file functions.
File Information/Status
This section displays the status of the file functions. - The Read File function displays the status of the Direct Platform Data file read function. - The Platform Cert function displays the status of the Platform Certificate file read function.
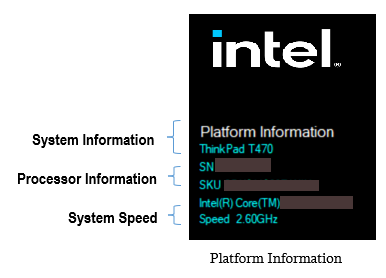
Platform information section
The Platform Information section provides fundamental system values, such as the system serial number, SKU number, processor type, and system speed.
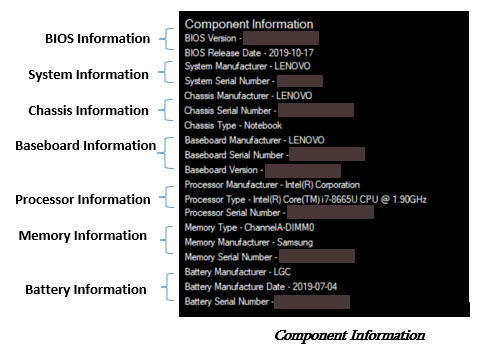
Component information section
The Component Information section displays a subset of the system component values: the system BIOS, motherboard, system, chassis, processor, memory, batteries, power supplies, and password status.
The component information values displayed are sourced from two different channels: the current, up-to-the-minute snapshot of the system component values, captured when the Scan System button is selected, and the component values from the Direct Platform Data file, read by the Read File function.
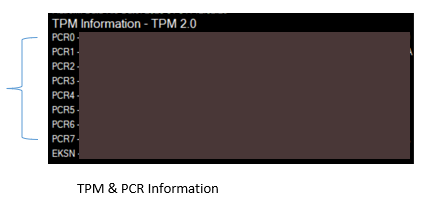
TPM & PCR information section
The TPM and PCR Information section contains information about the TPM mounted on the motherboard. The top line of the TPM section includes:
- TPM Version: Displayed at the top of the TPM section.
- PCR Registers: Located below the TPM Information section.
- TPM Endorsement Key Serial Number (EKSN): Displayed at the bottom.
The Auto Verify tool only supports systems with TPM 2.0 enabled. It displays the following error message when TPM 1.2 is enabled:
TPM Information -- TdPM 1.2 Not Supported
Systems with no TPM modules enabled display the following error message:
TPM Information -- No TPM Module Detected
The PCR Registers are below the TPM Registers Match section. The Auto Verify tool reads all 24 PCR registers but only displays PCR registers PCR0 - PCR7. These are the predefined PCR registers in the TCG specification. The following are the PCR0 - PCR7 registers definitions:
| PCR # | Description |
|---|---|
| 0 | BIOS, CRTM, and Host Platform Extensions |
| 1 | Host Platform Configuration |
| 2 | Option ROM Code |
| 3 | Option ROM Configuration and Data |
| 4 | IPL Code (usually the MBR) |
| 5 | IPL Code Configuration and Data |
| 6 | State Transition and Wake Events |
| 7 | Host Platform Manufacturer Control |
The Endorsement Key Serial Number (EKSN) is below the PCR Registers. It is a unique serial number that cryptographically binds the system to the TPM. During manufacturing, the system and motherboard serial numbers are cryptographically bound to the TPM on the motherboard. Any changes to the system or motherboard are flagged during the Platform Cert function.
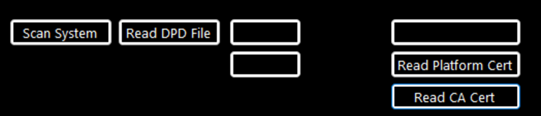
Function buttons section
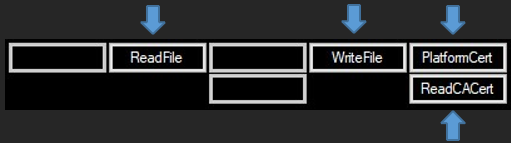
The Auto Verify tool has seven function buttons:
The Function buttons section contains all the functions you can perform using the Auto Verify Tool. It includes the following buttons:
- Scan System - Scans the platform components and the TPM information
- Read DPD File - Reads the Direct Platform Data file
- Compare - Compares the current system component value information to the component value information read from the Direct Platform Data file
- Next Diff - Scrolls through each component change identified in the Compare function
- Read Perform Cert - Checks the Platform Certificate using the TPM as the hardware root of trust
- Read CA Cert -
 Issuing certificate authority read file function
The Function buttons are described in the Auto Verify Tool Operation section.
Issuing certificate authority read file function
The Function buttons are described in the Auto Verify Tool Operation section.
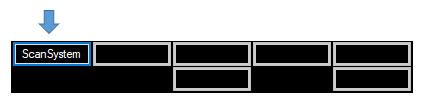
Only the Scan System button is active when the Auto Verify Tool is first executed. The Auto Verify Tool does not automatically scan the system without the user initiating the scan.
See the Scan System function section.
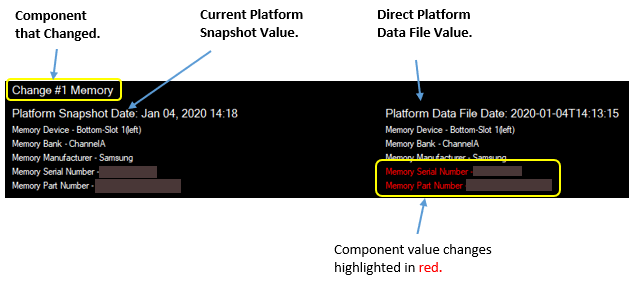
Snapshot comparison section
This section displays the differences between the component information from the current system scan and the component information in the As-Built Direct Platform Data file, which was loaded using the Read File function. Any changes in component information are highlighted in red.
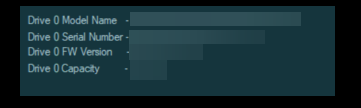
Drive information section
The Drive Information section displays the internal drive information. The drive information is sourced from the current system scan when the Scan System button is selected.
Auto Verify Tool operation
Scan System function
The Scan System function scans the system components and the TPM information. The scanning operation performs the following operations:
- Reads the following platform components: (BIOS, System, Motherboard, Chassis, Processor, Memory DIMMs, Batteries, AMT FW Version, Power Supplies)
- Reads the Trusted Platform Module PCR Registers, Public Endorsement Key, and the Endorsement Key Serial Number.
- Reads the Internal Drive Information. Note: External drives are not included.
- Reads the Window Management Instrument (WMI) information for the internal Keyboard, internal Pointer, and internal network devices. Note that external devices are not included.
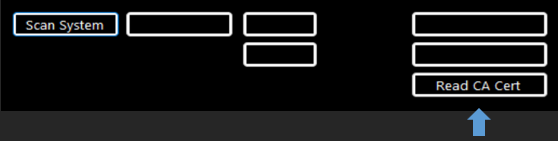
Select Scan System located in the lower right-hand section of the Auto Verify Tool UI.
Once the ScanSystem has been completed the Read CA Cert button is enabled.
After scanning is completed, the following message displays.

Issuing certificate authority read file function
The Platform Certificate, Direct Platform Data, and Statement of Conformance files downloaded from the Intel TSC Web Portal are signed using a PKI signing process. To validate the signature of the files, download Intermediate Certificate Authority file.
The Intermediate Certificate Authority file contains a public key used to verify the signature of the platform certificate and the direct platform data files. The Intermediate Certificate Authority file is downloaded from the Intel TSC Web Portal and saved on the system where the Auto Verify Tool is located. See the Transparent Supply Chain data files article for more information.
The Certificate Authority Signature Read file function will read in the intermediate Issuing Certificate Authority certificate file and extract the intermediate Public Key. The Platform Certificate file, the Direct Platform Data file, and the Statement of Conformance file are signed using a PKI signing process.
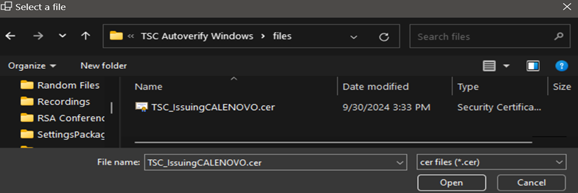
To read in the Issuing CA Certificate file, select the Read CA Cert button.
The Issuing CA Read file function prompts users to open the IssuingCA.cer file downloaded from the OEM URL.
Select the Certificate File and click the Open.
The tool validates the loaded issuing CA certificate against the Root CA. The Read Platform Cert and Read DPD File buttons are enabled if validation passes.
After the Issuing Certificate is read, the Issuing CA Information is displayed in the TPM Information section.
The Public Key Read Successfully message will be displayed at the top of the CA information section.
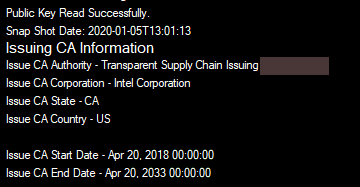
The Signature of the Platform Certificate file and the Direct Platform Data file are verified after the Public Key is read, using the Read Platform Cert and Read DPD File buttons.
Read direct platform data file function
The Read Direct Platform Data File function opens the Direct Platform Data file associated with the platform. Once the file has been read, the Direct Platform Data component values are loaded into the Auto Verify Tool and displayed on the UI.
The default directory is the directory in which the Auto Verify Tool was run.
To read the Direct Platform Data file, select Read DPD File.
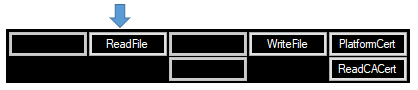
The
Read Filefunction prompts the user to open the Direct Platform Data file (.xml) associated with the system serial number. Opening the file displays only files with the system serial number in their filename with the .xml extension.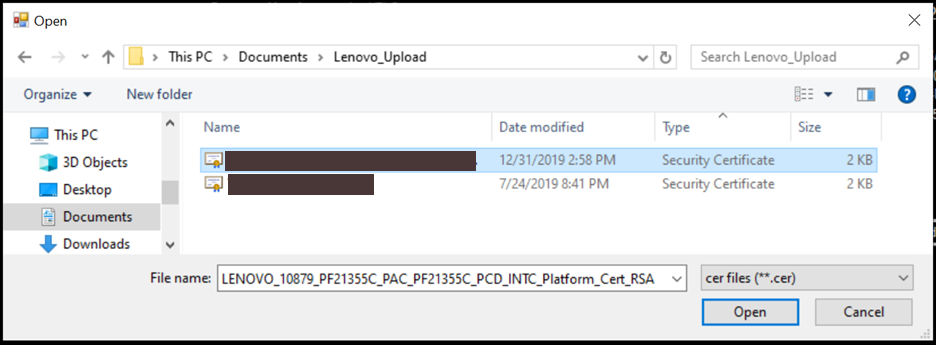
Select the
Direct Platform Datafile and then select Open.After the
Direct Platform Datafile is read, the message Direct Platform Data file read completed displays in the Function Status section.
The Auto Verify Tool is now ready to perform the Compare operation.
Compare platform components function
The Compare Platform Components function compares the current system component values captured by the Scan System operation to the component values read from the Direct Platform Data file.
To execute the compare operation, select Compare.
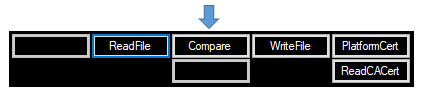
After completing the Compare operation, the scan results are displayed in the Scan Status information section.
- If the results of the Compare operation match, the No component changes have been detected message is displayed.

- If the results of the Compare operation do not match, the component change has been detected message is displayed.

The Snapshot Comparison section displays the changes in the component value. The total number of component changes is displayed in the component change has been detected section..
Compare Next component function
If more than one component change occurs, the Next Diff button is enabled after the Compare function is completed.
Select Next Diff to scroll through each component change identified in the Compare function.

After completing the compare operation, the scan results are displayed in the Scan Status information section.
The quantity of component changes is displayed at the beginning of the "component changes have been detected" message, as shown below.
Platform certificate verify function
The Platform Certificate Verify function checks the platform certificate issued for the platform using the TPM as the hardware root of trust. It checks that the TPM Endorsement Key serial number matches the Endorsement Key serial number in the platform certificate. The function also checks that the manufacturer, version, and serial number match the values in the platform certificate.
To initiate the
Platform Certificate Verifyfunction, select Read Platform Cert.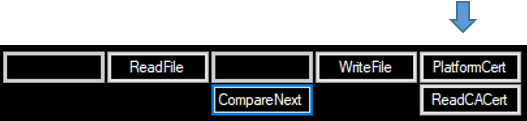
The
Platform Certificate Verifyfunction prompts users to open thePlatform Certificate file (.cer)associated with the platform serial number.Select the certificate file and then select Open.
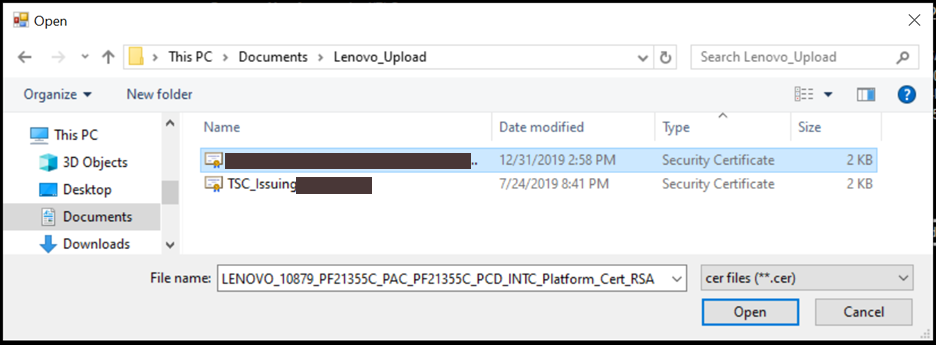
Select the Platform Certificate file and then select Open.
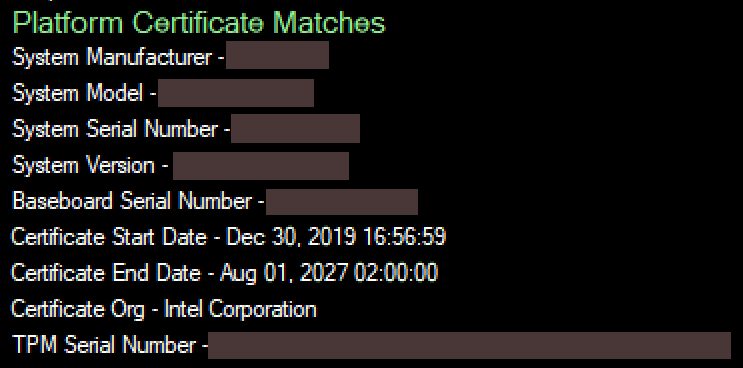
The Platform Certificate Verify function automatically runs when selecting the Open button. The results are displayed in the UI's TPM PCR Register section.
- If the platform certificate matches the system values, then the Platform Certificate Matches message is displayed along with the certificate values.
- If the Platform Certificate does not match the system values, then the Platform Certificate Does Not Match message displays along with the certificate values that do not match highlighted in red.
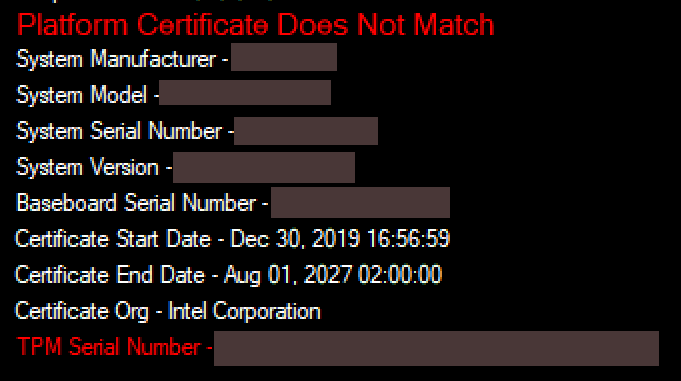
Platform certificate value changes are highlighted in red.
Open-Source Acknowledgements
This product includes software developed by the open-source community.
Bouncy Castle (Version 1.9) Bouncy Castle is a collection of APIs used in cryptography. It is licensed under the MIT License. Copyright (c) 2021 The Legion of the Bouncy Castle Inc. (https://www.bouncycastle.org). For more details, see the Bouncy Castle License: https://www.bouncycastle.org/licence.html.
Microsoft TSS (Version 2.1.1) Microsoft TSS is a library for TPM 2.0. It is licensed under the MIT License. Copyright (c) 2019 Microsoft Corporation For more details, see the Microsoft TSS License: https://github.com/Microsoft/TSS.MSR/blob/main/LICENSE.