· 06/07/2024 ·
Getting Started
This page describes a quick sample workflow to cover the basic prerequisites so that you can generate your first attestation using Intel® Trust Authority.
Admin API key management
Admin API Keys are needed to manage all non-attestation functions in Intel® Trust Authority. This includes creating Attestation API keys, inviting new users, changing user permissions, managing policies, and managing subscription levels.
Warning
Intel recommends rotating the Admin API keys whenever a Tenant Admin user is removed, or "downgraded" to User. The Admin API keys previously accessible to the former Tenant Admin remain active and usable unless rotated.
An admin API key is the only authorization required to execute nearly all REST APIs except attestation-related APIs, which require an attestation API key. (Thus, an admin API key can't be used to attest a TEE.) Nearly anything that can be done in the portal can also be done by using the Intel Trust Authority REST API. An exception is retrieving the value of an attestation API key, which can only be done through the portal.
View Admin API keys
Sign in to the Intel® Trust Authority portal.
Note
The portal works best with Google Chrome, Microsoft Edge, Mozilla Firefox, and Safari.
Select Admin API keys.
View the API keys in the table.
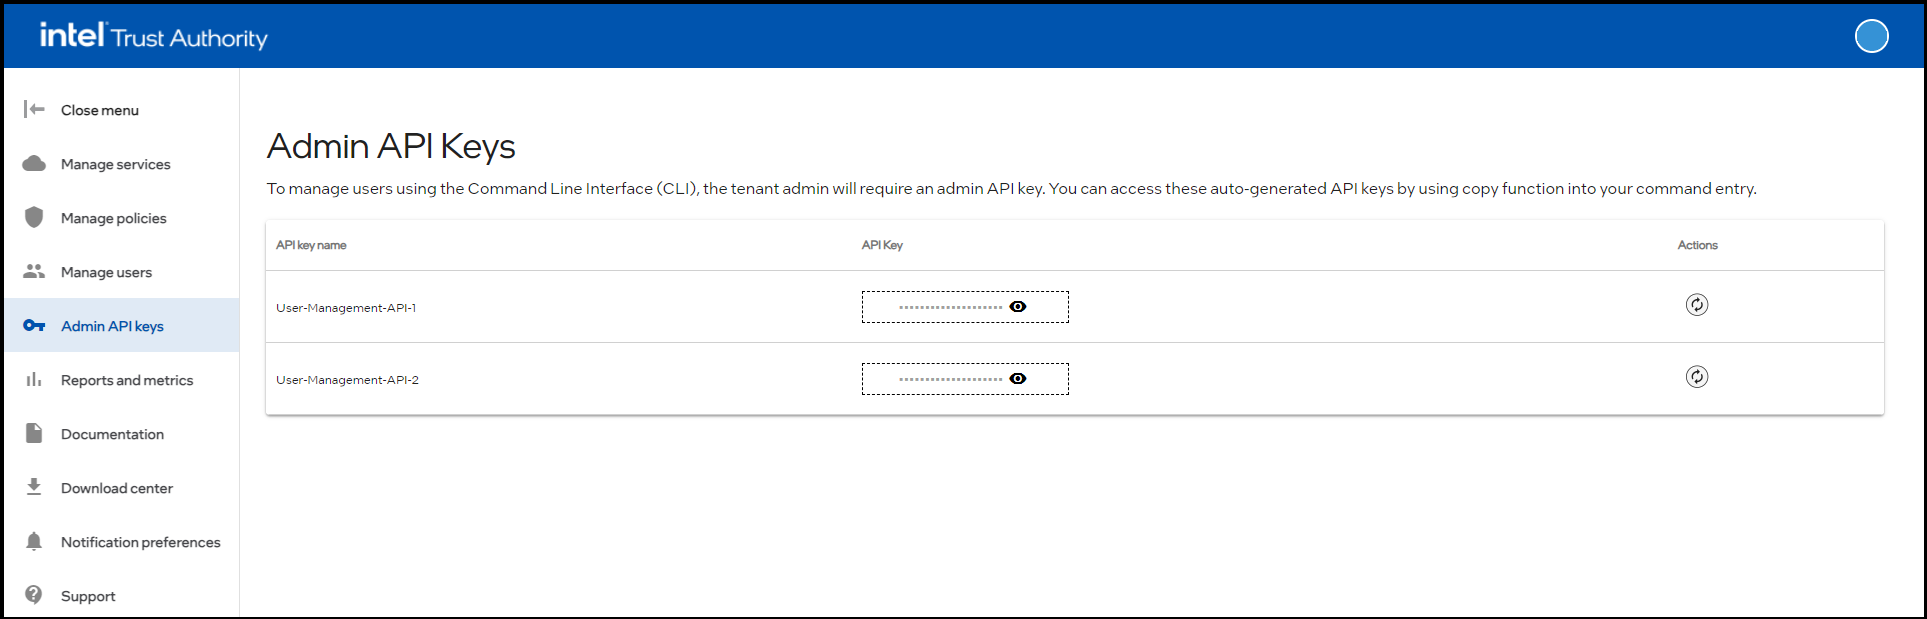
Copy Admin API keys
Sign in to the Intel® Trust Authority portal.
Select Admin API keys.
Go to the API key to be copied.
Select the view
 icon for the API key you want to copy.
The API key is displayed.
Select the copy
 icon.
icon.The API key is copied to your system memory.
The API key can be used with the trustauthorityctl CLI utility to manage admins and users.
Attestation API Keys
Attestation API keys are used to authenticate attestation-related functions. Attestation functions include generating a new attestation token, creating a signed nonce, and requesting a Faithful Verification token audit report. An Attestation API key is required to accompany all attestation-related requests. An Attestation API key lets you attest any supported TEE.
You can create a new attestation API key in the portal or by using the REST API. You can only retrieve the new key value from the portal. This is to prevent a rogue client from creating and using a new attestation key. The only way a client can obtain and use a new attestation key is for a user with access to the portal to transfer the key to the client.
You can associate one or more attestation policies to an Attestation API key. The policies (if any) are applied to all attestation requests that are authorized by this key. Policies can also be specified in the attestation request, and in this case the policies specified with the attestation request replace the associated policies—that is, the associated policies are not evaluated; only the specified polices are evaluated.
Attestation API keys may also have tags, which can be used for reporting and metrics visibility. All API keys have at least one tag, the default Workload.
Create an attestation API key
Any user can create attestation API keys available for all users within the tenant organization.
Sign into Intel® Trust Authority .
Select Manage services.
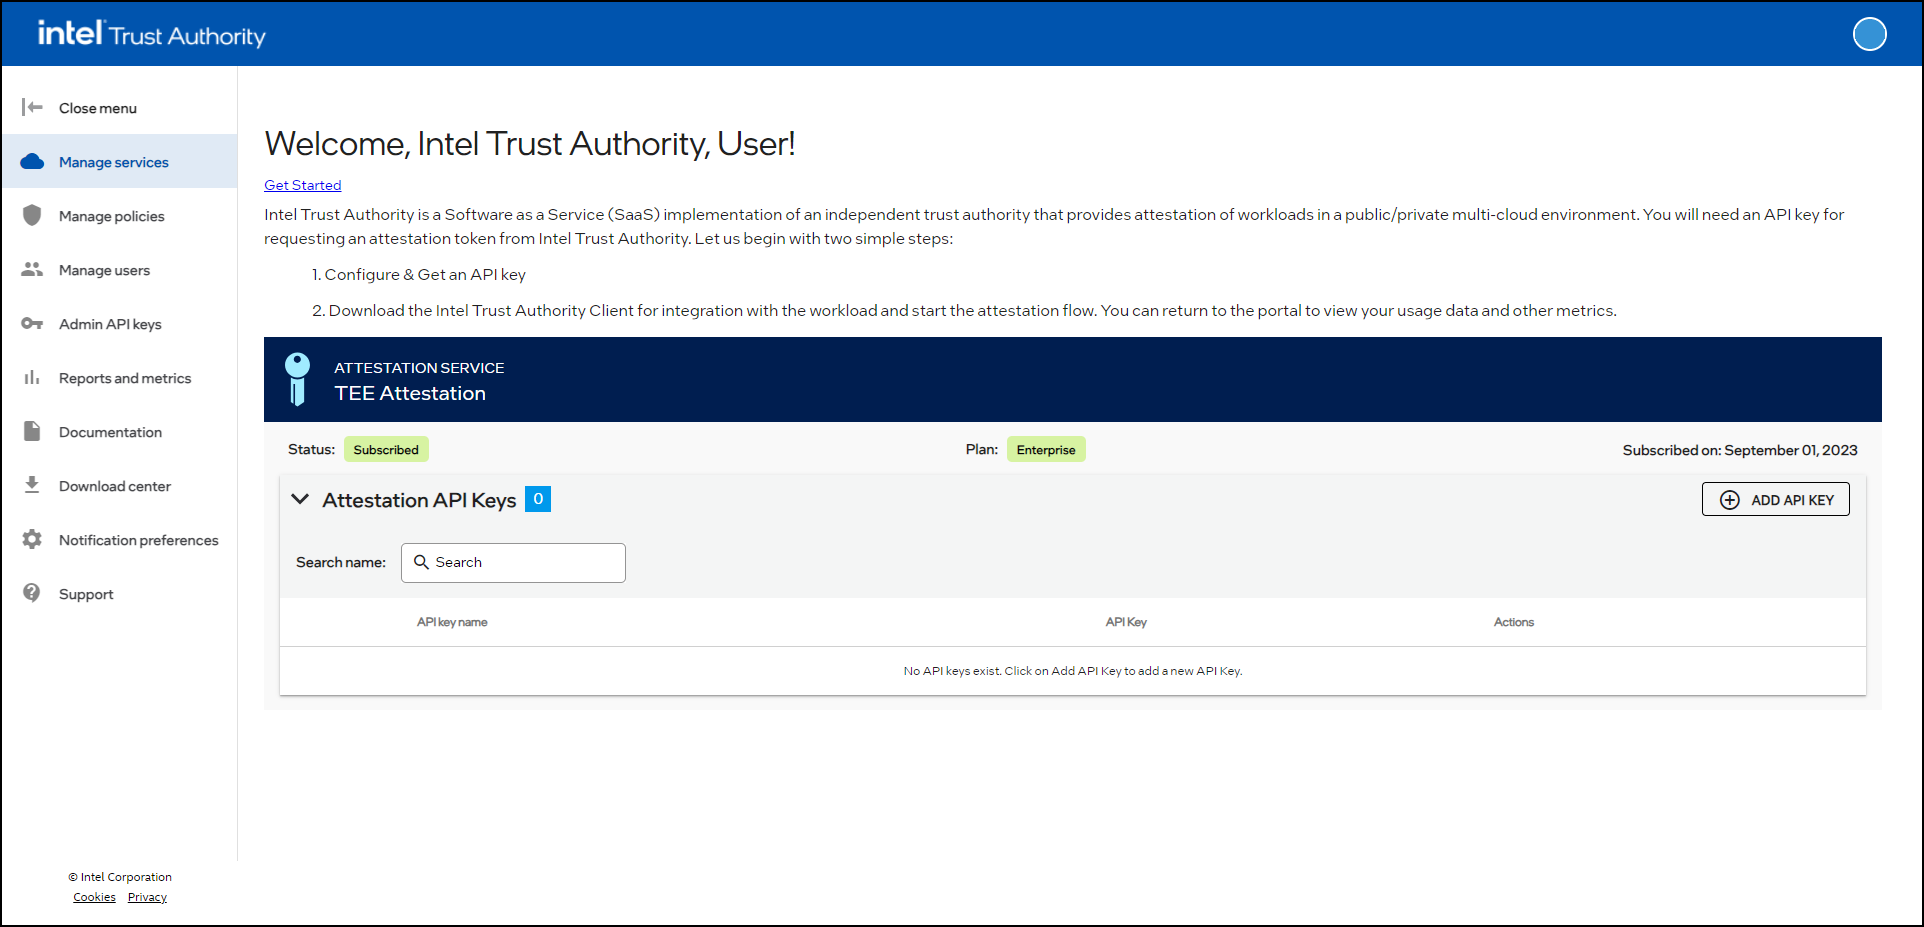
Select ADD API KEY.
The Add API key page displays.
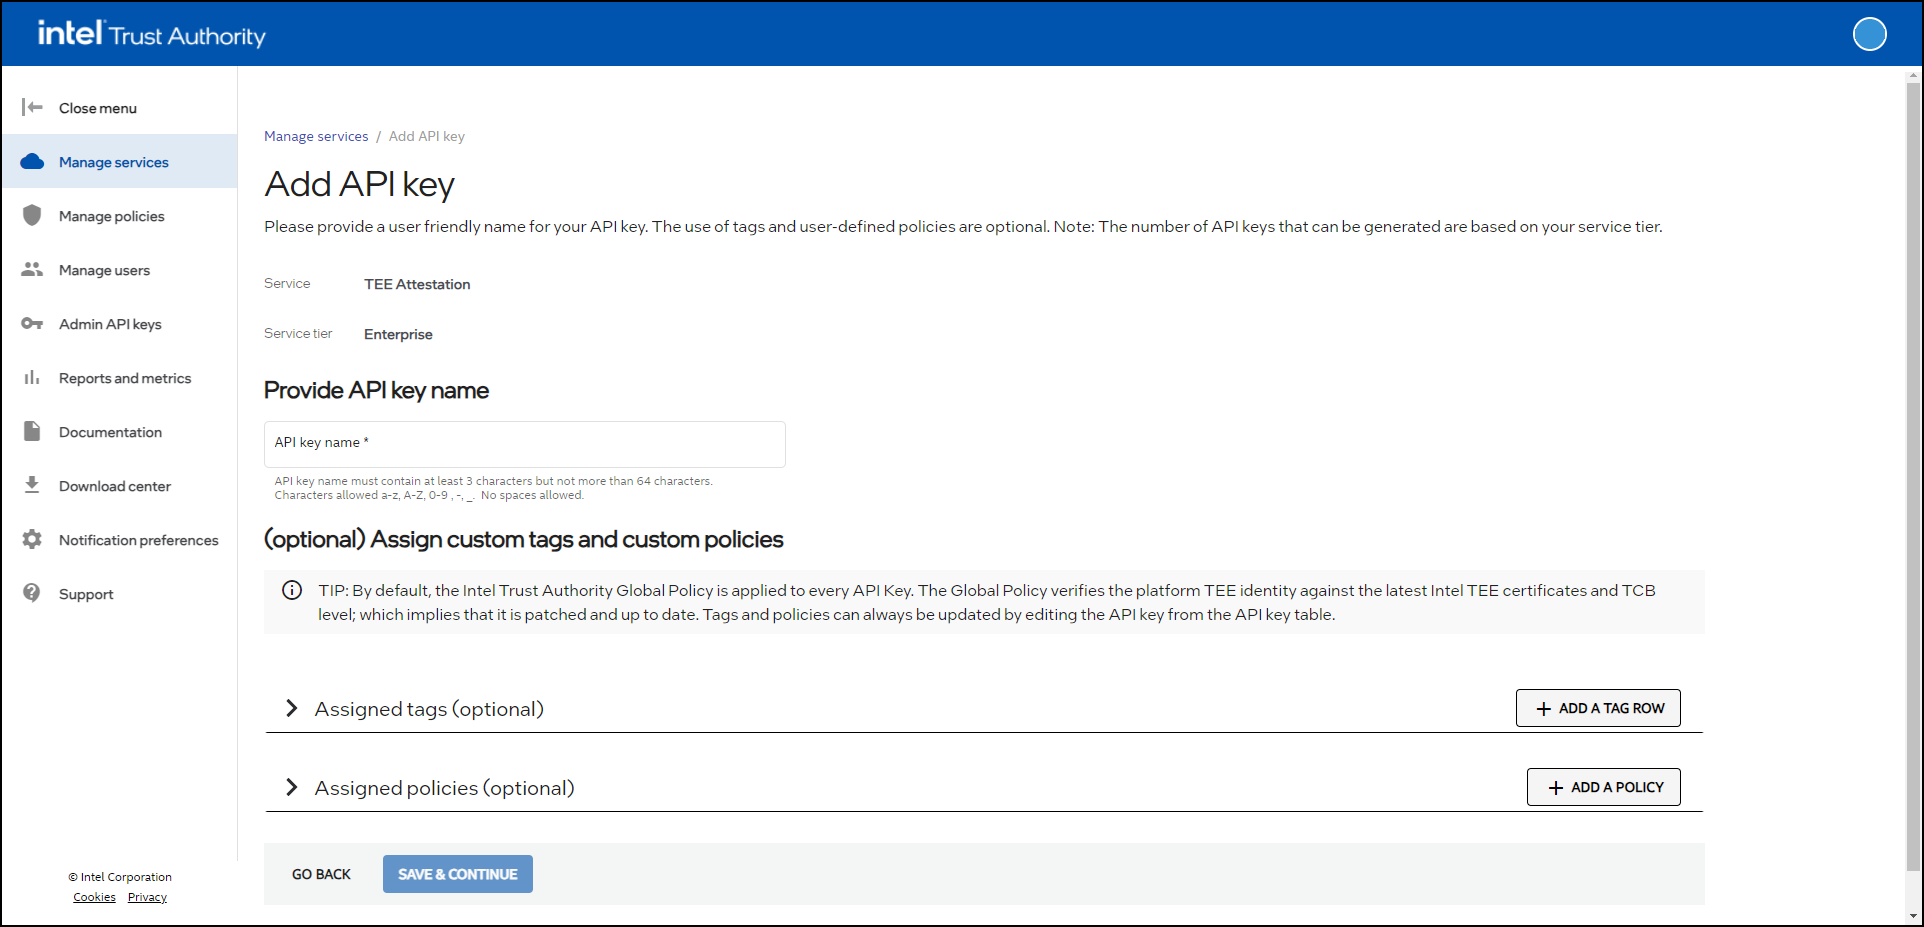
Provide a name for the API key. Names can be any string of up to 64 alphanumeric characters. Spaces and special characters other than "_" or "-" are not supported.
Optionally, assign one or more tags to the new API key. Tags are key-value pairs used to help track utilization for reports and metrics. The Workload tag is pre-defined. The workload tag can use values like an application's name to track the attestations requested by a given application. See Tag management for more details.
Optionally, assign one or more policies to the new API key. Use the Select an existing policy dropdown menu to choose from existing policies. Alternatively, you can create a new policy by selecting the Create a new policy radio button. See Policy management for more details.
Once finished, select SAVE & CONTINUE.
Review the information on the Confirm API key details page.
If everything is correct, select SUBMIT.
The new API key is created, along with any new tags and/or policies.
Note
There might be a delay of up to two minutes before a new Attestation API key becomes active.
Requesting an Attestation
For this example we will attest an Intel SGX enclave. Examples are provided using the REST API and the Golang client libraries.
This option uses the Intel® Trust Authority REST API directly to request an attestation, but assumes you have an existing SGX application with an ability to retrieve an SGX quote.
Request a nonce
curl --location 'https://api.trustauthority.intel.com/appraisal/v1/nonce' \
  --header 'Accept: application/json' \
  --header 'x-api-key: <attestation API key>'
Note
If you are in the European Union (EU) region, use the following Intel Trust Authority URL:
curl --location 'https://api.eu.trustauthority.intel.com/appraisal/v1/nonce' \
Sample response:
{
 "val": "UHRKZ09RZFpxU3lCSzllS1FkbkgyMTFGN0ZNRHM4WERoR014b0Y0bENwUktaMDNrY2l3L2xjdmpCWW10eStLZERVWUtKSGRGRXI0THNMdkludEdsVFE9PQ==",
 "iat": "MjAyMy0wNi0xMiAyMDo0NDo0NiArMDAwMCBVVEM=",
 "signature": "kcnt3nLP0HhS0FMKnSB5pgZgDp0Pfar55MDt+lv9GqTrRi4lARaow/cGsPUJcK98Rcb6X2lxGtF8o2TP8AVMLANuqDga/QdpqR+vSfx523swM+ud1aJaTzbV4/o/lKSDSK/oV+Oe5o2IPfVKqedhXdJV/0xm51iMcESxw0wS8AnKliTRwsV9lCJujasAJIGt2LurLcuF89+DnXqo9p9WBUNv5vacjmz6p85Gun7VY9+5flWHBqEZTPWr4ddxHIOyUsOR31BtqgVIf5zFAKlLOUyrH4+ENUJADsnmBJmY5JIbaAFuetucj1dS5ISBTokrOSNUwrSeK0ktQoV7WV3yGdKrjwZS1vGEp85B0/ZUZAgwevsG9QhO8YPXIwbQ40bPUi/gssIogIpN6gC647YDGNqglHwlCopWFJE/O8D3k7f/ywHuNvCL1qYWjJbCdkrNLkBSUJ8eikcIiKqE/Dt2xMk+wiVsCK9nEkzLxzTeFRPayMQVRBRo9x4LLWzsybg2"
}
Retrieve an SGX quote from an SGX-enabled application, including the actual quote and any enclave user_data/runtime_data. The nonce
valandiatvalues from the nonce must be concatenated with any enclave runtime_data and included in the quote. For example:nonce.Val | nonce.Iat | runtime_dataRequest an attestation token
curl --location 'https://api.trustauthority.intel.com/appraisal/v1/attest' \
 --header 'Accept: application/json' \
 --header 'x-api-key: <attestation API key>' \
 --header 'Content-Type: application/json' \
 --data '{
     "quote": "<Full SGX quote>",
     "verifier_nonce": {
         "val": "<from nonce request>",
         "iat": "<from nonce request>",
         "signature": "<from nonce request>"
     },
     "policy_ids": [<optional list of additional policy IDs to appraise during attestation>],
     "runtime_data": "<SGX user_data from the SGX quote>"
 }'
Changing your password
After changing your password, you may be unable to log back into the Intel Trust Authority portal. If this occurs, close all your browser windows. A fresh browser will enable you to log in with the updated password. If you still have trouble logging in, please contact support.